


Scaling a Shopify store means more orders, more stores, more warehouses, and more chances for inventory to end up in the wrong place.
Even with solid forecasting, stock doesn’t always land where it’s most needed. One location might be sitting on excess inventory, while another is struggling to fulfill orders.
That’s where Shopify inventory transfers become essential.
Instead of rushing to reorder or risking lost sales, you can simply shift existing stock between locations to fix allocation issues, meet demand, and stay efficient.
We break down how inventory transfers work, when to use them, and how to make the process seamless, especially if you're running on Shopify.
Inventory transfers in Shopify refer to the process of moving stock from one location to another, be it from a central warehouse to a retail store or between two fulfillment centers.
The main purpose of inventory transfers is to rebalance stock across locations based on changing demand, inventory levels, or fulfillment needs.
This is important for multi-location Shopify brands.
Inventory transfers make multi-store inventory management easier and more efficient. Here's how:
Inventory transfers let you shift existing stock between locations instead of placing new POs to reorder from suppliers.
This means you can quickly respond to a stockout risk in one store by pulling excess from another, avoiding missed sales and shipping delays.
If one location is overstocked with inventory that isn’t moving, you’re paying unnecessary storage, insurance, and potential markdown costs.
Moving stock to a higher-demand location helps keep inventory flowing while reducing the risk of spoilage, waste, or costly write-offs.
By keeping high-demand products stocked at the right location, the orders are fulfilled faster and closer to the customer.
This translates to shorter shipping times, lower logistics costs, and a smoother post-purchase experience, especially important for Shopify brands offering fast or local delivery.
Nothing’s more frustrating than telling a customer a product is out of stock even when it’s available in another location.
Transfers maintain consistent availability across all your stores, reducing the chance of abandoned carts, negative reviews, or lost loyalty.
Customer demand can shift quickly due to seasonality, trends, or promotions. Inventory transfers give you the flexibility to react in real time, moving stock where it’s needed most without waiting on supplier lead times or new production runs.
Before you can start using inventory transfers in Shopify, you’ll need to configure your store’s locations and enable inventory tracking. Here’s how to set it all up.
Shopify inventory transfers only work for products with inventory tracking enabled.
- Go to Products in your Shopify admin
- Click on a product
- In the Inventory section, check "Track quantity"
- Save your changes
Repeat for all products you want to include in transfers.
You need at least two active locations (e.g., warehouse, retail store, 3PL) to transfer inventory between them.
- Go to Settings > Locations in your Shopify admin
- Click Add location
- Enter the name, address, and details for each physical or virtual location
- Make sure each location is active and fulfills online orders, if applicable
- Save each one
Note: Shopify supports up to 1,000 locations depending on your plan.
Once your locations are set up, assign inventory to them
- Go to Products > Inventory
- Select a product and click on its details
- Under the Inventory section, adjust quantities for each location
- Click Save
This helps Shopify recognize where your stock is stored and allows you to initiate transfers accordingly. Make sure each product has inventory assigned to the correct locations.
Tip: Keep stock levels updated manually across multiple locations or via an inventory management app for real-time syncing.
If you're working with a team, make sure relevant team accounts have permission to manage inventory and transfers.
- Go to Settings > Users and permissions
- Choose a staff account
- Ensure Products and Inventory permissions are enabled
In Settings > Locations, click on Edit fulfillment priority to reorder your locations. This will set the shipping priority that Shopify will use to fulfill online orders.
It's not strictly required, but it streamlines automatic allocation and dispatch.
Once your inventory locations are set up in Shopify, creating a transfer is the next step to balancing stock across locations.
Here’s how to do it in a few clicks.
1. Selecting the Source and Destination locations
- From your Shopify admin, go to Products > Transfers
- Click Create transfer
- In the Origin section, select the location you're transferring stock from (e.g., your main warehouse)
- In the Destination section, select the location you're transferring stock to (e.g., a retail store or 3PL)
2. Entering product details and quantities
In the Add products section, search or browse for the SKUs you want to include in the transfer. Once added, enter the quantities for each product under the Quantity column.
Tip: Make sure your inventory levels are updated in each location to avoid inconsistencies or errors during the transfer.
3. Reviewing and confirming the transfer details
Before saving the transfer, you can
- Add a reference name to easily identify the transfer later
- Add tags for better organization and filtering
- Include notes (e.g., reason for transfer or special handling instructions)
- Adjust the creation date if needed
Once everything looks good, click Save. The system will save your transfer as a draft.
4.Processing your Transfer
Once the items are ready to move, you’ll need to process the transfer by updating its status.
From Products > Transfers, click the transfer you want to process
Click Mark as, then choose one of the following options
- Ready to ship: Reserves inventory at the origin location. A shipment can now be created.
- In progress: Marks inventory as in transit. It’s also marked as incoming at the destination.
- Transferred: Immediately receives and makes inventory available at the destination location.
Click Save to confirm the action.
Once you process the transfer, you can no longer change the origin or destination, but you can still edit products, notes, or tags.
Shopify does not automatically reserve stock for transfers. If the origin location doesn’t have enough available inventory, you’ll see an error or an incomplete transfer status.
To handle this
- Adjust quantities to match available inventory
- Wait until restocks arrive, then complete the transfer
- Consider doing a partial transfer and initiating another one later for the remaining items.
By using inventory transfers regularly, you can fix stock imbalances quickly, reduce the need for emergency reordering, and keep your fulfillment running smoothly, especially across multiple Shopify stores or warehouses.
One common reason transfers fail or stock appears missing? It’s not actually being tracked in Shopify.
Here’s how to fix the inventory not tracked issue.
Once a transfer is initiated, it’s just as important to monitor its progress, keep records accurate, and use the data to optimize future allocation decisions.
Shopify offers some features to help you stay on top of inventory transfers across all your locations.
1. Monitoring transfer status and progress
After creating a transfer, you can track its status from the Products > Transfers section in your Shopify admin. Each transfer will show a status such as
- Draft: Transfer created but not yet marked as ready to ship. No inventory is reserved at this stage.
- Ready to ship: The transfer is prepared, and inventory has been reserved at the origin location.
- In progress: The inventory is marked as in transit. All shipments associated with the transfer are on their way to the destination.
- Transferred: The inventory has been fully received at the destination and is now available for sale or fulfillment.
- Canceled: The transfer has been canceled, and any reserved inventory is returned to the origin location's available stock.
You can click into each transfer to view
- Origin and destination details
- List of products and quantities
- Notes, tags, and creation date
- A history log of received quantities
This helps you stay organized and catch any discrepancies early.
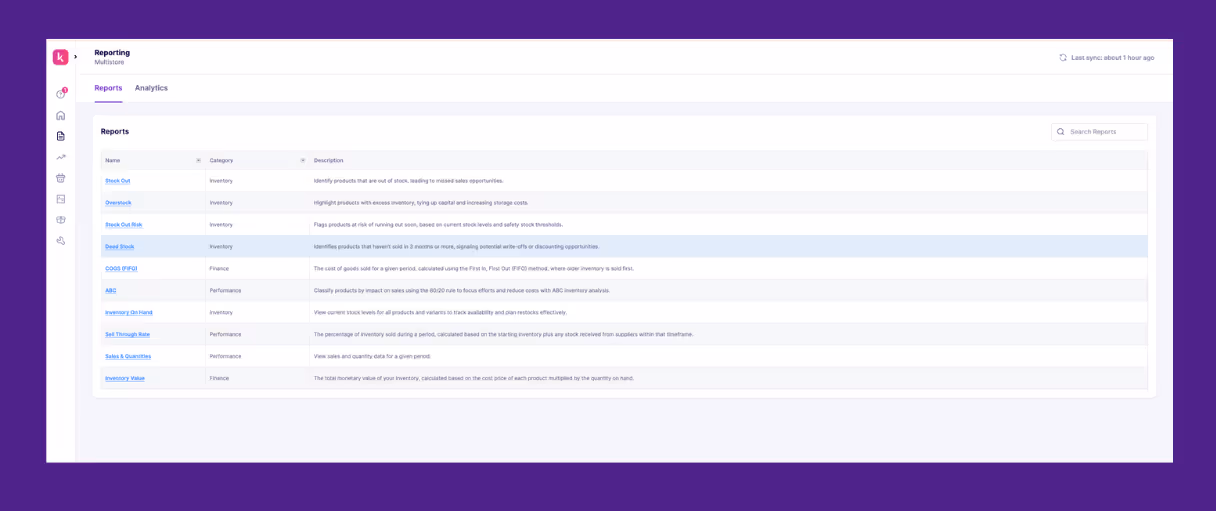
2. Utilizing Shopify’s reporting
While Shopify’s built-in reports are somewhat limited, you can still gain useful insights by
- Exporting transfer data to CSV for deeper analysis
- Manually tracking which locations frequently require transfers (a sign of poor initial allocation)
- Identifying slow-moving stock that may be better placed elsewhere
- Monitoring transfer frequency to detect operational inefficiencies
For more advanced and automated reporting, use tool like Prediko can layer in real-time forecasting and location-level insights to improve future allocation planning.
Efficient transfers are only one piece of the puzzle. Learn how to allocate inventory in the first place with our full guide.
3. Ensure accurate transfer records
To keep your inventory data clean and actionable
- Always mark items as received once they arrive at the destination so that stock levels update correctly
- Use notes and tags to track why transfers were initiated (e.g., seasonal restock, urgent fulfillment, overstock correction)
- Regularly audit transfers so quantities match physical stock
- Assign internal owners to each transfer to maintain accountability
- Review transfer trends monthly to identify preventable errors or recurring issues
Once inventory arrives at the destination location, it’s crucial to mark it as received in Shopify to maintain accurate stock levels and avoid fulfillment issues. Here's how to finalize your transfer process smoothly.
1. Mark transfer as Received
- Go to Products > Transfers in your Shopify admin
- Click on the specific transfer you want to update
- Under each product listed, enter the actual quantity received
- If you’ve received all items, click Mark as received to complete the transfer.
Shopify will automatically update the inventory at the destination location.
2. Verify the inventory quantities upon receipt
Don’t skip this. Physically count the items before marking them as received. This helps
- Prevent discrepancies between systems and shelves
- Catch damages or missing units before they affect your orders
- Ensure team accountability across warehouses or store locations
3. Resolve discrepancies and update stock levels
If the received quantities don’t match the original transfer
- Update the received quantity manually in the transfer
- Use the Notes section to document issues (e.g., damaged, short-shipped)
- If necessary, initiate a follow-up transfer or reconcile with the origin location
Accurately receiving inventory ensures your Shopify reports reflect real-time availability, and your customers don’t face unexpected stockouts or delays.
Want to get ahead of stockouts before they cost you? Read our full guide on how to not run out of stock.
Now that we’ve covered how to set up and manage inventory transfers in Shopify, let’s go a step further.
If you’re scaling across multiple stores or warehouses, these advanced strategies will help you stay ahead of demand, avoid stockouts, and expedite operations.
1. Automate inventory transfer using Shopify apps
Manually transferring stock between locations can be time-consuming and error-prone.
Shopify apps, like Prediko, allow you to set up automated rules or alerts for low-stock thresholds at each location and give visibility into overstocked SKUs, so you can trigger transfers proactively.
This way, the inventory moves where it’s needed, without a lot of intervention, saving time, reducing stockouts, and keeping inventory balanced across your stores.
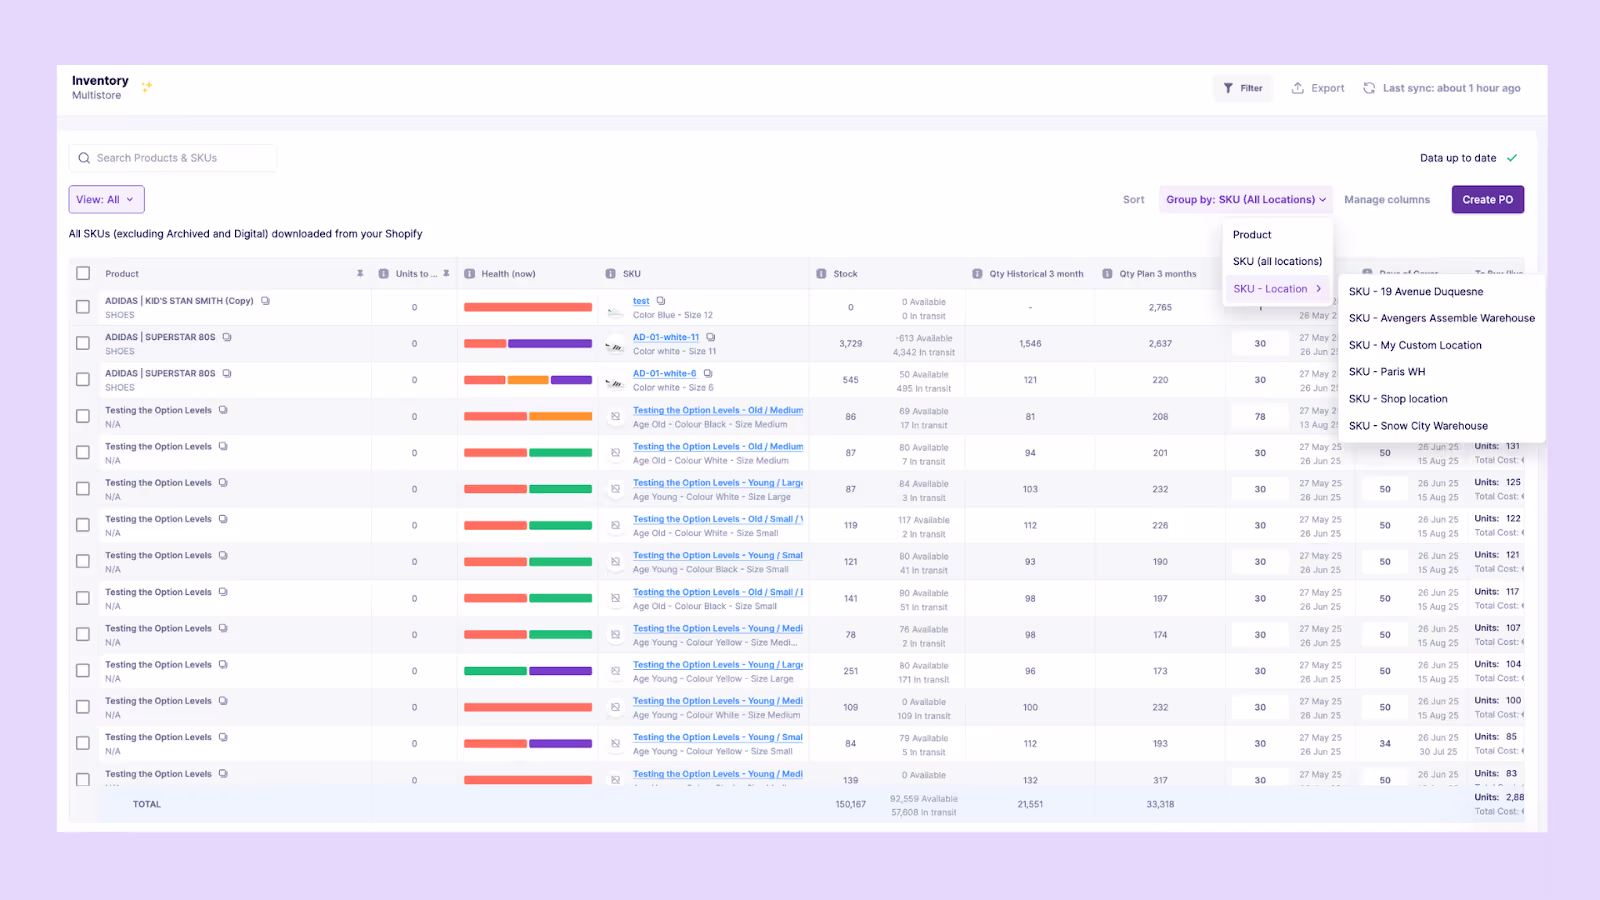
2. Unify inventory data across locations
Avoid siloed systems. Use a centralized inventory platform like Prediko that syncs inventory in real time across all Shopify stores, warehouses, and even POS.
This eliminates data discrepancies and lets you do smarter allocation.
3. Optimize inventory distribution across stores
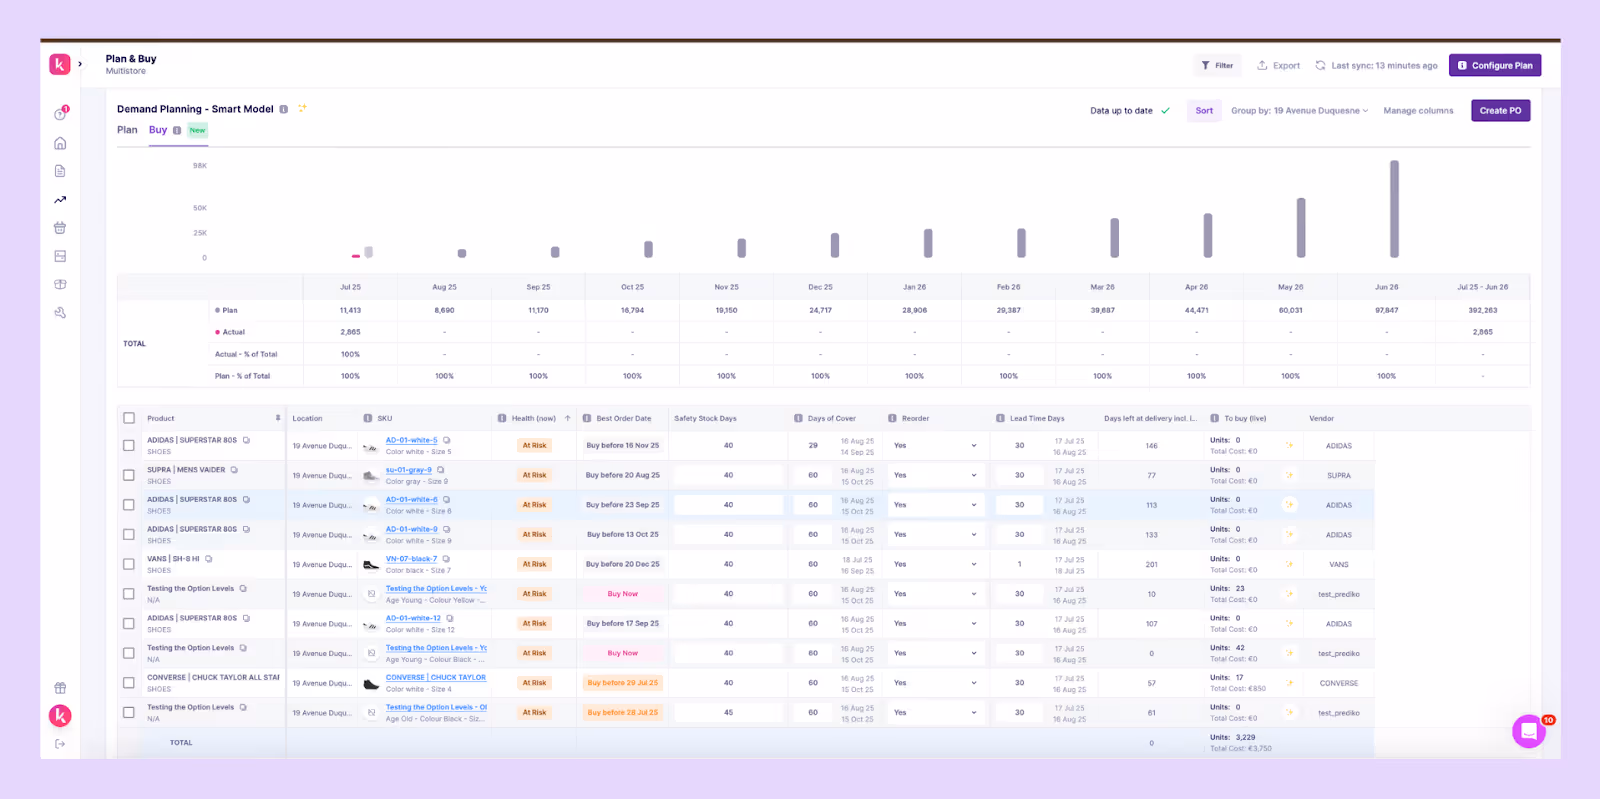
Different stores = different demand patterns. Forecast demand at the location level using historical data, seasonality, and local trends so that each store is stocked based on its actual velocity.
Prioritize high-performing stores and fulfillment centers to reduce overstocks in slower regions and improve delivery speed to customers.
With Prediko, plan inventory by location. Its AI algorithm takes into account store-level demand, supplier lead times, and sales velocity, so you always know what to stock, where, and when.

4. Integrate with third-party inventory management tools for smarter operations
While Shopify’s built-in features work for simple operations, growing brands often need more flexibility.
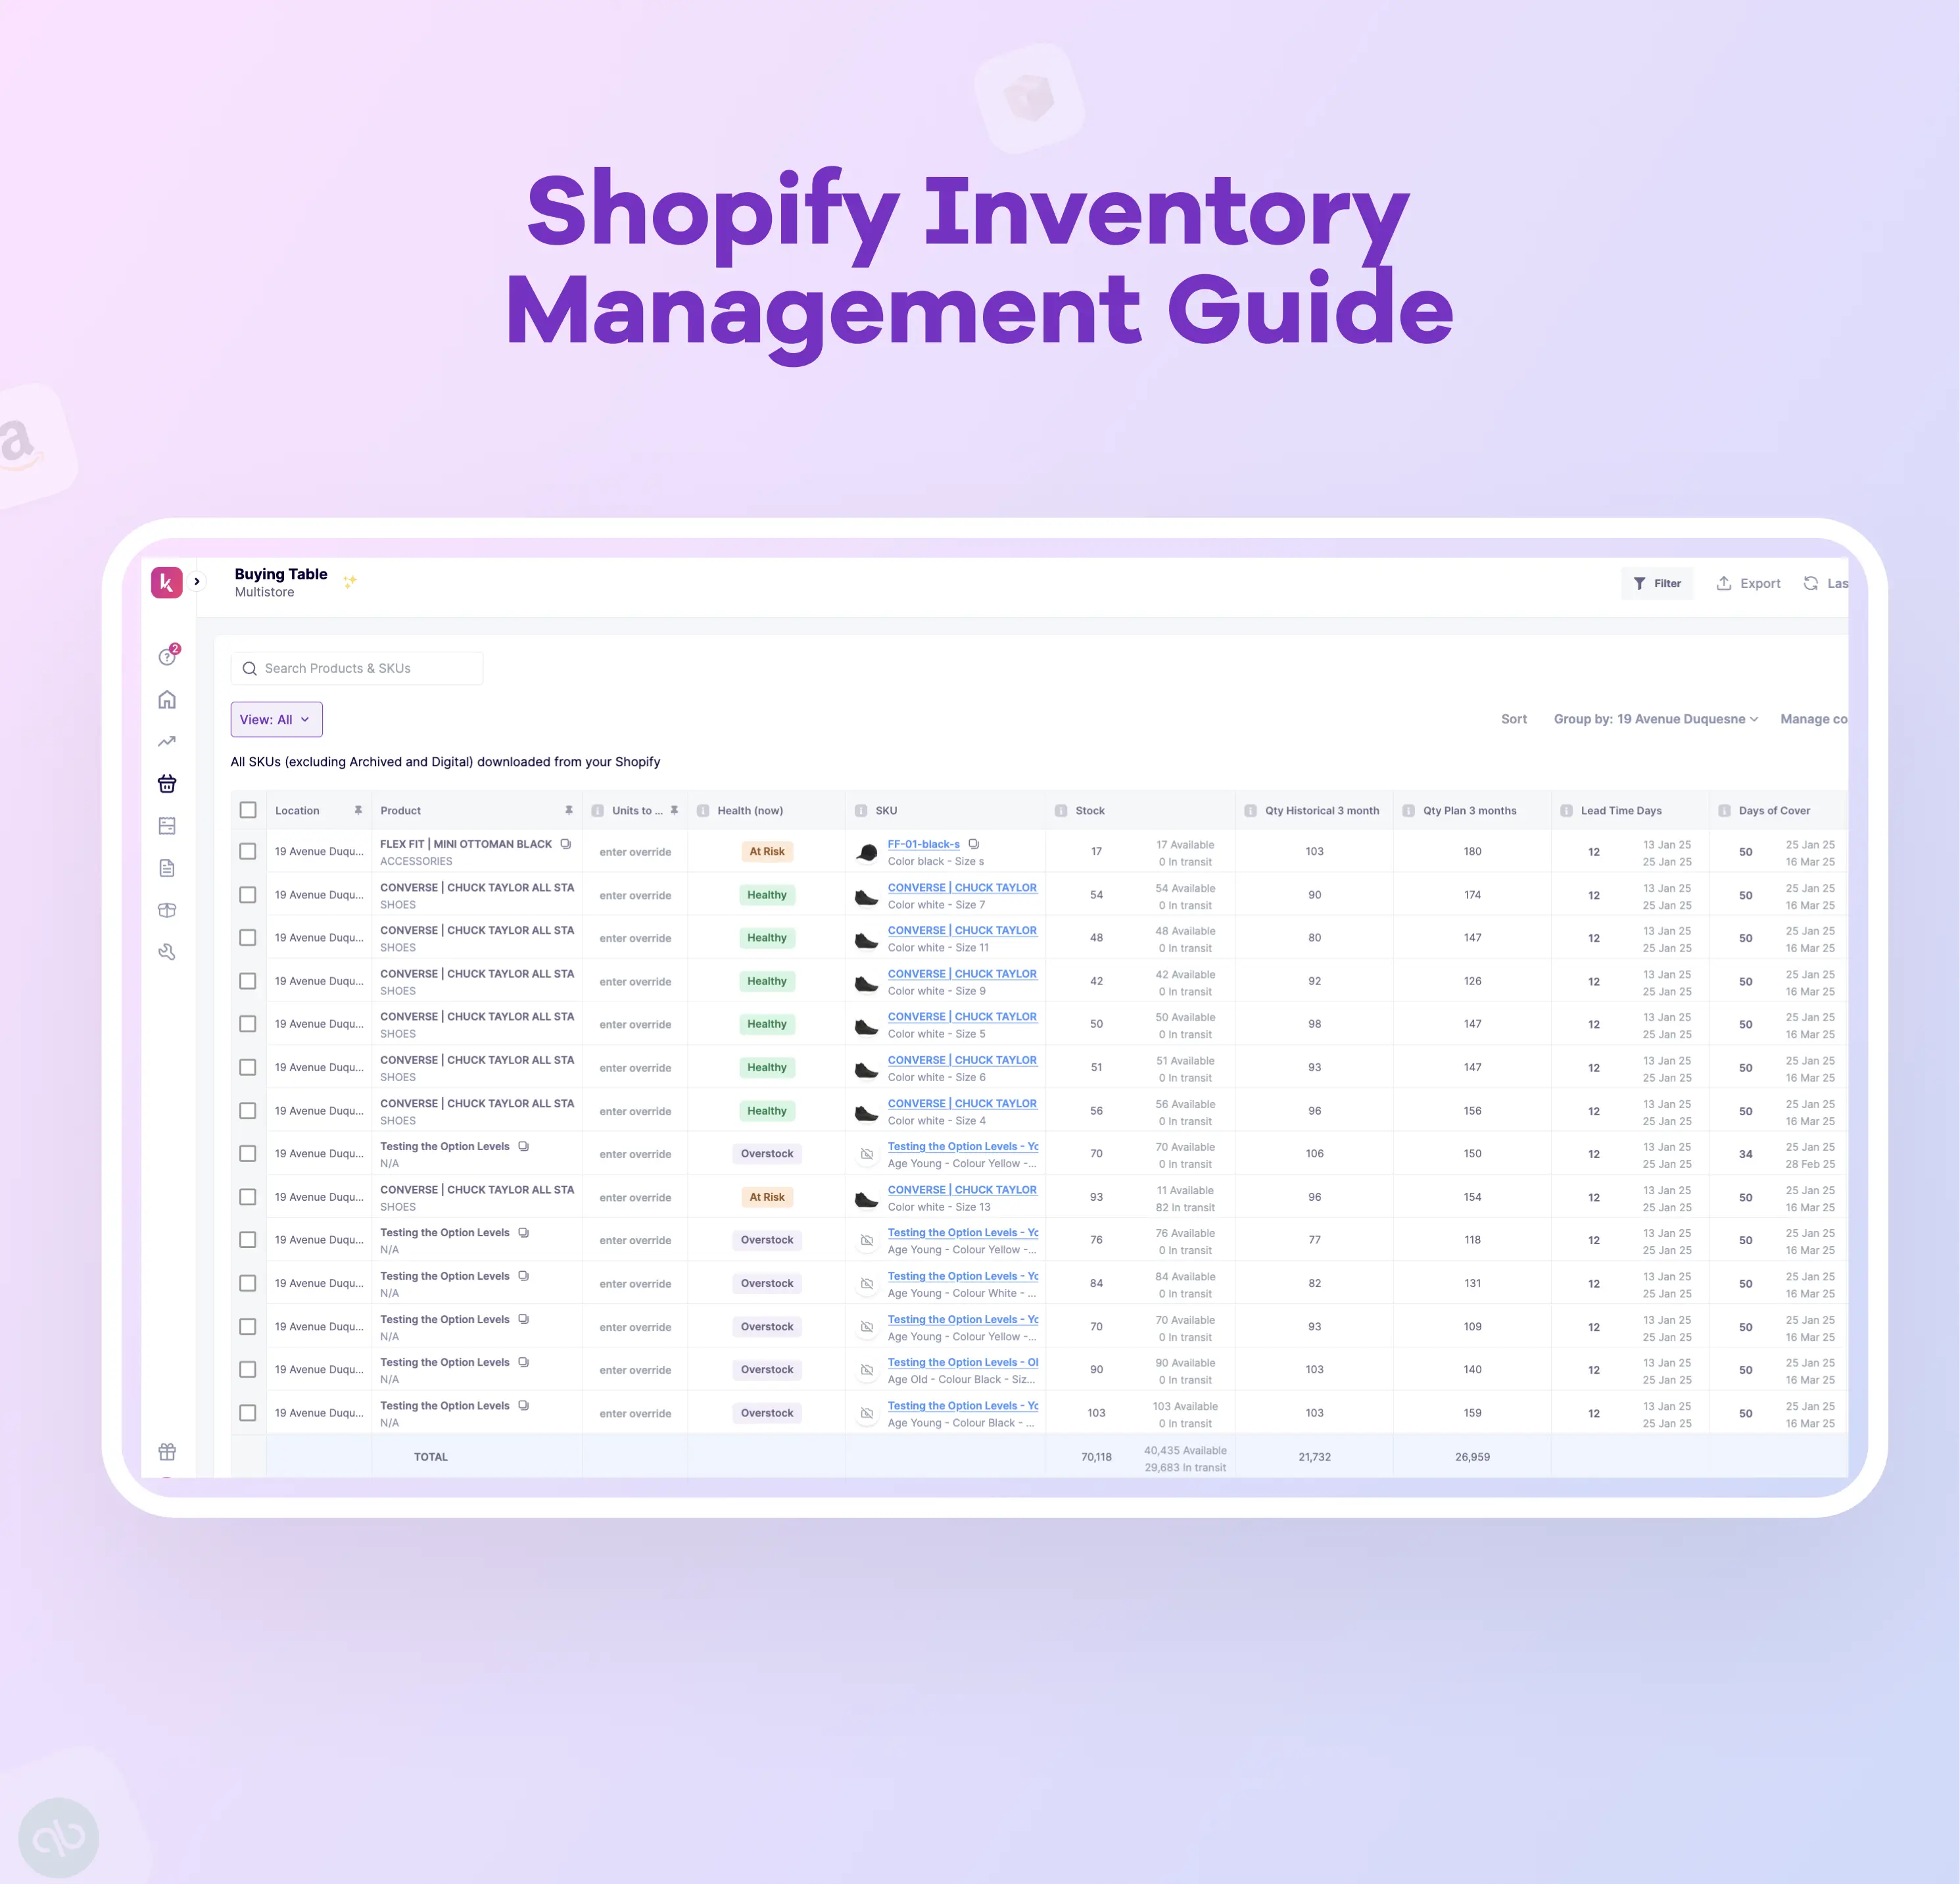
Integrating with an advanced inventory management tool like Prediko gives you
- Real-time visibility across all your stores and warehouses
- AI-powered demand forecasting and supply planning
- Smarter purchase order management
- Proactive raw materials planning and management
- Granular inventory reports and analytics, including sell-through rate, dead stock, etc
- 60+ integrations with 3PLs, WMS, and POS
Using Prediko, you can even create inventory transfers directly within Shopify, so you’re not constantly switching between tools or tabs.
It becomes your HQ for all things inventory management.

Inventory transfers are a powerful way to fix stock allocation issues, especially when you're managing multiple stores, warehouses, or sales channels.
Whether it's redistributing slow-moving SKUs or rushing products to high-demand locations, transfers help you stay agile and serve your customers better.
But while Shopify makes it possible to handle transfers manually, doing it all by hand quickly becomes time-consuming and error-prone as your operations scale.
That’s where you need a tool like Prediko that doesn’t just track your inventory, it helps you act on it. From showing you which SKUs are overstocked or at the risk of stockout to letting you create Shopify transfers directly within the platform, it becomes your go-to app for smarter inventory allocation and faster decision-making.
If you’re serious about growing your multi-store Shopify business without growing the chaos, start a free 14-day trial of Prediko.
How do I create and manage inventory transfers in Shopify?
Go to Products > Transfers in your Shopify admin. Click Create transfer, choose the origin and destination, add products and quantities, and click Save. You can later update the transfer status (e.g., ready to ship, in progress, or transferred) to track progress.
What are the steps to track inventory transfers between locations in Shopify?
Once a transfer is created and processed, Shopify updates its status as Draft, Ready to Ship, In Progress, Transferred, or Canceled. You can view and manage transfer progress under the Transfers tab, including shipment details and received inventory.
How can I troubleshoot issues with Shopify inventory transfers?
Common issues include incorrect locations, missing product variants, or stock not updating. Double-check location settings, ensure products are trackable, and confirm SKUs exist in both locations. If problems persist, review Shopify’s transfer status or use an inventory app like Prediko for added visibility.
Can I automate inventory transfers in Shopify?
Shopify’s native system doesn’t support full automation, but apps like Prediko let you set low-stock alerts, view overstocked SKUs, and suggest transfers, so you can act proactively and save time.
What are the best practices for managing inventory transfers in Shopify?
- Use clear reference names and notes for every transfer
- Set low-stock thresholds to trigger timely transfers
- Regularly review transfer statuses and records
- Keep products synced across locations
- Consider an inventory tool to streamline tracking and reporting


.avif)